Vendure Plus Gift Card Plugin
Add support for gift cards and store credit with this full-featured plugin created by the Vendure core team.
Sign up to be notified when our paid plugins become available
Integration type
Category
Last published
1 of 3
Vendure Gift Card Plugin
This plugin adds support for gift cards (a.k.a. gift vouchers) & store credit to your Vendure application.
Features
- Customizable gift card designs
- Personalized message for gift card recipient
- Scheduled delivery of gift cards
- Administrators may issue gift cards / store credit to specified customers
- Multiple gift cards may be used against a single Order
- Gift cards may be combined with other payment methods (e.g. credit card) to pay for an Order
- Gift cards may be partially used, the balance being kept available for future Orders.
Setup
- Ensure you have a
TaxRateset up in your default tax zone with a rate of0. This is required when automatically creating the Gift Card product upon bootstrap. - Add the plugin to your VendureConfig:
import { GiftCardPlugin } from '@vendure-plus/gift-card-plugin'; export const config = { //... plugins: [ GiftCardPlugin.init({ defaultImagePaths: [ // The plugin ships with some generic gift card images you can use to get started 'path/to/node_modules/@vendure-plus/gift-card-plugin/default-gift-card-black.jpg', 'path/to/node_modules/@vendure-plus/gift-card-plugin/default-gift-card-gold.jpg', 'path/to/node_modules/@vendure-plus/gift-card-plugin/default-gift-card-silver.jpg', ], createDefaultGiftCardProduct: { // On bootstrap, a new ProductVariant will be created with the following details name: 'Gift Card', sku: 'GC01', }, }), ], }; - Add the UI extensions. This plugin requires the ui-devkit in order to compile a custom Admin UI including the advanced search extensions. See our guide to extending the Admin UI.
import { compileUiExtensions } from '@vendure/ui-devkit/compiler'; import { GiftCardPlugin } from '@vendure-plus/gift-card-plugin'; // ... plugins: [ AdminUiPlugin.init({ route: 'admin', port: 3002, app: compileUiExtensions({ outputPath: path.join(__dirname, '../admin-ui'), extensions: [GiftCardPlugin.uiExtensions], devMode: false, }) }), ], - Set up delivery of gift card notifications. When a gift card is purchased, 2 emails should be sent: one to the recipient, and one confirmation of sending to the customer who bought it. If you are using Vendure’s EmailPlugin, you’ll need to set up a couple of handlers like this:
// gift-card-email-handlers.ts
import { EmailEventListener } from '@vendure/email-plugin';
import { GiftCardDispatchEvent, PurchasedGiftCard } from '@vendure-plus/gift-card-plugin';
import { ConfigService, EntityHydrator, Injector } from '@vendure/core';

export const giftCardEmailHandler = new EmailEventListener('gift-card')
  .on(GiftCardDispatchEvent)
  .filter((event) => event.giftCard instanceof PurchasedGiftCard)
  .loadData((event) => loadGiftCardData(event))
  .setFrom(`{{ fromAddress }}`)
  .setRecipient((event) => {
    if (event.input?.recipient) {
      // The gift card has been manually dispatched, so use
      // the recipient email address from the input
      return event.input.recipient;
    } else {
      return (event.data.giftCard as PurchasedGiftCard).recipientEmailAddress;
    }
  })
  .setSubject(
    `You received a £{{ formatMoney giftCard.initialValue }} gift card from {{ giftCard.senderName }}!`,
  )
  .setTemplateVars((event) => ({
    giftCard: event.data.giftCard,
  }));

export const giftCardDeliveryConfirmationEmailHandler = new EmailEventListener(
  'gift-card-delivery-confirmation',
)
  .on(GiftCardDispatchEvent)
  .filter((event) => event.giftCard instanceof PurchasedGiftCard)
  .loadData((event) => loadGiftCardData(event))
  .setFrom(`{{ fromAddress }}`)
  .setRecipient(
    (event) => (event.data.giftCard as PurchasedGiftCard).purchasedWithOrder.customer!.emailAddress,
  )
  .setSubject(`Your gift card to {{ giftCard.recipientEmailAddress }} has been delivered`)
  .setTemplateVars((event) => ({
    giftCard: event.data.giftCard,
    customer: event.data.customer,
  }));

async function loadGiftCardData({ event, injector }: { event: GiftCardDispatchEvent; injector: Injector }) {
  const entityHydrator = injector.get(EntityHydrator);
  const { ctx, giftCard } = event;
  await entityHydrator.hydrate(ctx, giftCard as PurchasedGiftCard, {
    relations: [
      'image',
      'purchasedWithOrder.customer',
      'purchasedWithOrder.lines.items',
      'purchasedWithOrder.shippingLines',
    ],
  });
  const { assetStorageStrategy } = injector.get(ConfigService).assetOptions;
  if (assetStorageStrategy.toAbsoluteUrl) {
    const toAbsoluteUrl = assetStorageStrategy.toAbsoluteUrl.bind(assetStorageStrategy);
    if (giftCard.image && ctx.req) {
      giftCard.image.preview = toAbsoluteUrl(ctx.req, giftCard.image.preview);
    }
  }
  return { giftCard, customer: (giftCard as PurchasedGiftCard).purchasedWithOrder.customer };
}
import { giftCardEmailHandler, giftCardDeliveryConfirmationEmailHandler } from './gift-card-email-handlers'; export const config = { //... plugins: [ EmailPlugin.init({ handlers: [ ...defaultEmailHandlers, giftCardEmailHandler, giftCardDeliveryConfirmationEmailHandler, ], // ... }), ], };<!-- /static/email/templates/gift-card/body.hbs --> {{> header title="You received a gift card!" }} <mj-section background-color="#fafafa"> <mj-column> <mj-text color="#525252" align='center'> <h1>You received a £{{ formatMoney giftCard.initialValue }} gift card from {{ giftCard.senderName }}!</h1> </mj-text> <mj-image width="300px" src="{{ giftCard.image.preview }}?preset=medium" /> <mj-text font-style='italic' font-size='18px' color="#525252"> "{{ giftCard.message }}" </mj-text> <mj-text align='center'> Your code: <h2>{{ giftCard.code }}</h2> </mj-text> </mj-column> </mj-section> {{> footer }}<!-- /static/email/templates/gift-card-delivery-confirmation/body.hbs --> {{> header title="Your gift card has been delivered" }} <mj-section background-color="#fafafa"> <mj-column> <mj-text color="#525252" align='center'> <h1>Your gift card has been delivered</h1> </mj-text> <mj-image width="300px" src="{{ giftCard.image.preview }}?preset=medium" /> <mj-text color="#525252"> <p>Recipient: {{ giftCard.recipientEmailAddress }}</p> <p>Amount: £{{ formatMoney giftCard.initialValue }}</p> <p>Message: "{{ giftCard.message }}"</p> </mj-text> </mj-column> </mj-section> {{> footer }}GiftCardDispatchEvent. - This plugin makes several changes to the DB schema - adding new entities and custom fields. Therefore you will need to run a migration after configuring the plugin.
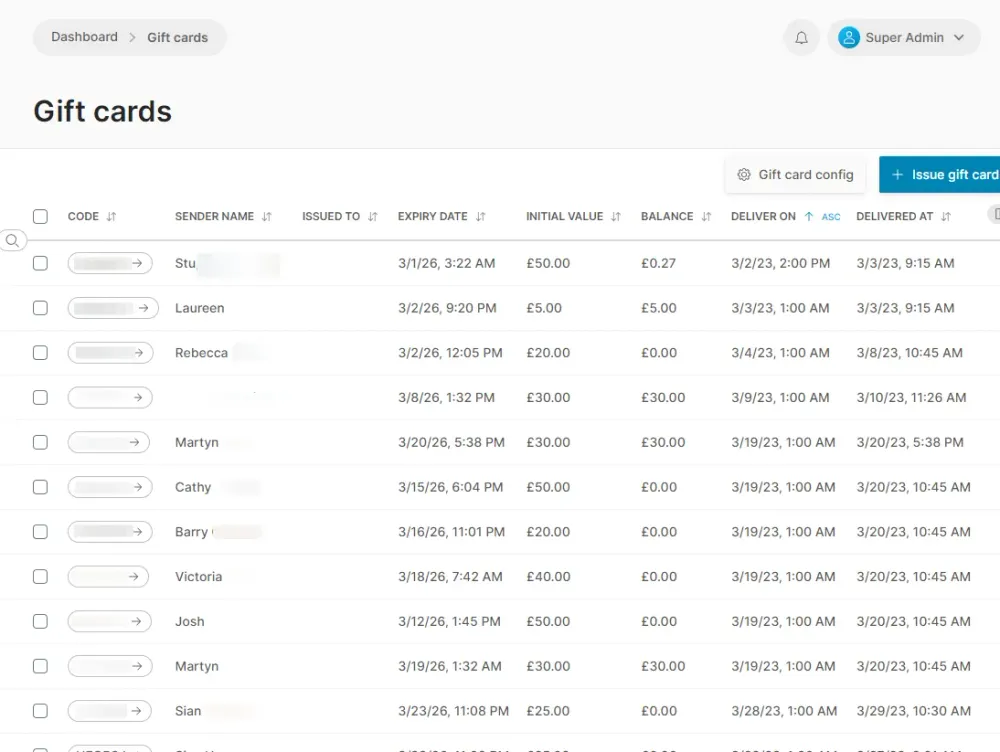
- In the Admin UI, click the new item
Sales -> Gift cards. This will take you to the gift card list. From here you can view details of existing gift cards and configure the available template images (via the “gift card config” button in the top bar).
Storefront implementation
Purchasing a Gift Card
In your storefront, you should create a dedicated page for purchasing gift cards. This is because gift cards have a unique set of configuration requirements (such as recepient email address, schedule etc) and they do not use the usual addItemToOrder mutation.
Every storefront implementation will be different, but here are the main parts you’ll need to include:
- Fetch the available gift card templates. Use the following query to fetch a list of templates which you can then display to the custom so they can choose the design of their gift card:
query GetGiftCardTemplates { giftCardTemplates { id image { preview } } } - This query will return an array of template objects, including the template ID and the image asset, which you can then display to the customer and allow them to select the desired id.
- The page should also have form inputs to allow the customer to configure the other aspects of the gift card:
- value
int- the value of the gift card. This will also be the price of the gift card when added to the Order. - senderName
string - recipientEmailAddress
string - message
string- optional greeting to the recipient. - deliveryDate
Date- optional. If omitted, the gift card will be dispatched upon completion of the Order.
- value
- To add to cart, execute the following mutation:
mutation AddGiftCardToOrder($input: AddGiftCardToOrderInput!) { addGiftCardToOrder(input: $input) { ...on Order { id state # ...etc } ...on ErrorResult { errorCode message } } - The
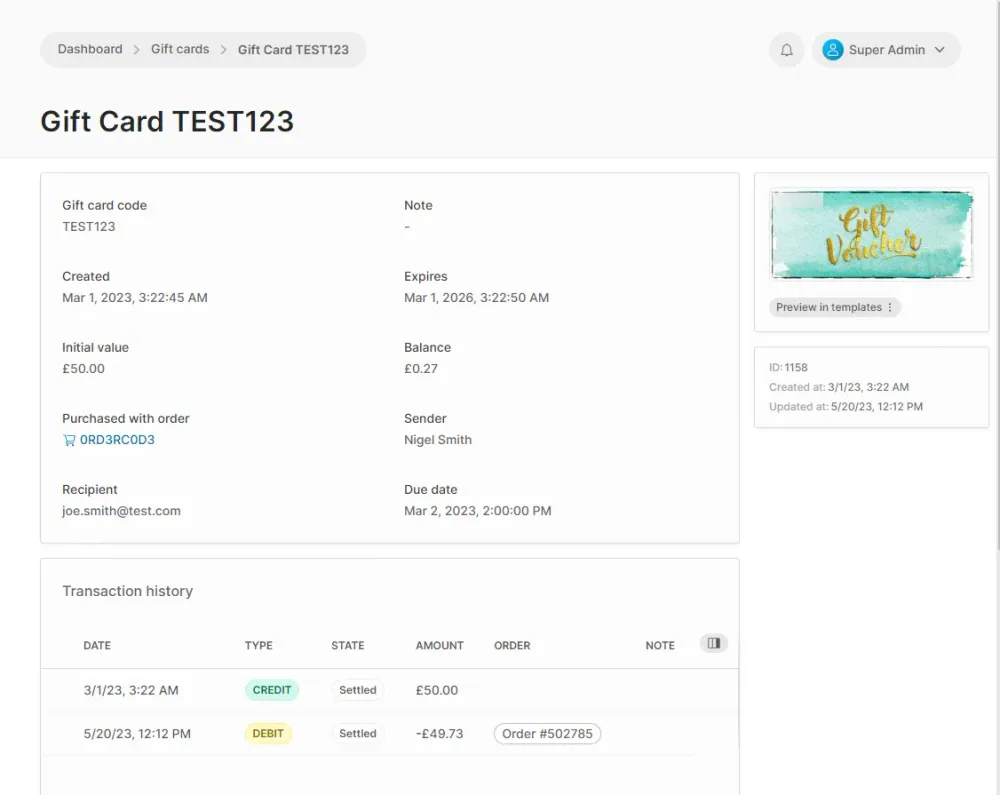
OrderLinetype has been extended with agiftCardInputfield, which allows you to display the details of the gift card in your order summary table:query GetActiveOrder { activeOrder { id # ... lines { id linePriceWithTax quantity giftCardInput { value senderName recipientEmailAddress message deliveryDate templateId } } } } - Once the Order is completed, a new GiftCard entity will be created according to the configuration entered by the customer. You’ll be able to see it in the Admin UI gift card list view.
Using a gift card on an Order
Once a gift card has been created (either via Customer purchase as described above, or via an Administrator creating one from the Admin UI), it can then be applied to an Order.
Conceptually, a gift card is actually a payment method. If you look in the Admin UI Settings -> Payment methods you should see a new gift-card-payment method has automatically been created.
- Since a gift card is a kind of payment method, it makes sense to allow the Customer to apply the gift card as part of the checkout flow. This is done with the following query:
mutation ApplyGiftCardToOrder($code: String!) { applyGiftCardToOrder(code: $code) { ... on Order { id totalWithTax totalWithTaxAfterGiftCard giftCardsApplied { code balance } } ... on ErrorResult { errorCode message } } }totalWithTaxAfterGiftCardshows how much the Customer would have to pay after deducting the available balance on any applied gift cards. You should usetotalWithTaxAfterGiftCardto display the Order total everywhere you currently usetotalWithTax. - A gift card can be removed from the Order using this mutation:
mutation RemoveGiftCardFromOrder($code: String!) { removeGiftCardFromOrder(code: $code) { ... on Order { id # ... etc } } } - When checking out, for each gift card in the
Order.giftCardsAppliedarray, you should execute the regularaddPaymentToOrdermutation, passing the method as'gift-card-payment'and the metadata as{ code: giftCardCode }. - If the applied gift card(s) do not cover the order total, you’ll also need to add a regular payment to cover the remainder. This should be done after adding the gift card payments.
Viewing open gift card balance
A Customer can view the balance of any gift card they have partially used on previous orders by querying the new
Customer.openGiftCards field from the Shop API:
query GetCustomerDetails {
  activeCustomer {
    id
    firstName
    lastName
    emailAddress
    openGiftCards {
      id
      code
      balance
    }
  }
}
Scheduling of gift card deliveries
When a gift card is purchased with the deliveryDate undefined or set to today’s date, a GiftCardDispatchEvent will be published immediately upon completion of the order. However, if the delivery date is set to some future date, the event will not get published. Instead, it will need to be manually dispatched by either:
- Executing the
dispatchDueGiftCardsmutation in the Admin API. This can be set up to run automatically each day, e.g. as part of a cron job. - Manually dispatching all due gift cards via the Admin UI - when there are gift cards due, there will be a button available in the gift card list view which allows you to publish all due GiftCardDispatchEvents.
Gift Card Expiry
Gift cards can be set to expire, so that after the expiry date they can no longer be used. Attemping to execute the applyGiftCardToOrder mutation on an expired gift card will return an ErrorResult.
Note: regulations regarding gift card expiry differ from country to country. For example, some countries impose a minimum duration, and some may not allow expiry at all. Check your local laws before setting up expiry.
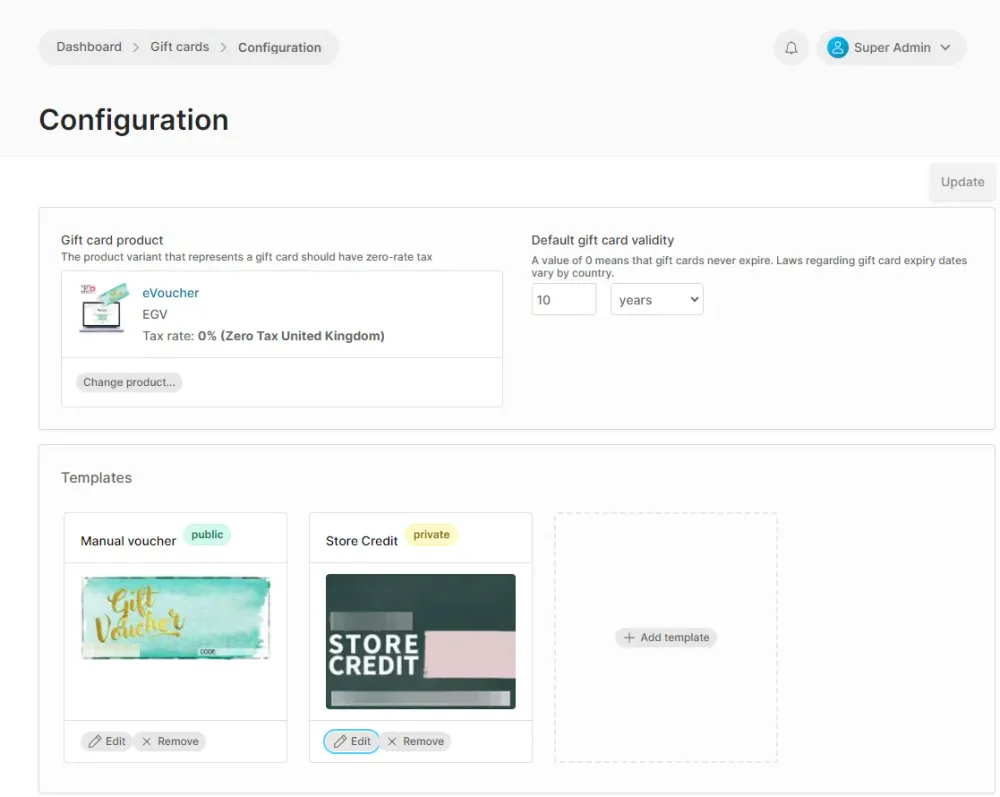
The default duration of a gift card’s validity is set in the Gift cards > Configuration screen.
Setting the number to 0 will cause gift cards to have no expiry date.
Gift card image generation
In the Gift cards -> configuration screen, there is a toggle labeled “Generate unique image for each gift card”. When enabled, this enables a feature which will create a new Asset for each gift card, allowing the template image to be overlaid with the gift card value and code.
Assets created in this way will be tagged with the “giftcards” tag.
You can additionally specify the positioning, size, color and font of the overlaid text. To specify the available font options, you need to configure the plugin like this:
import { GiftCardPlugin } from '@vendure-plus/gift-card-plugin';

export const config = {
  //...
  plugins: [
    GiftCardPlugin.init({
      // ...
      // Custom fonts can be specified here. The `location` should be an absolute path to the font file.
      customFonts: [{
        fontFamily: 'Adlery Pro Swash',
        location: path.join(__dirname, '../static/fonts/Adlery-Swash-TTF.ttf'),
      }],
      availableFontStacks: [
       'Arial, Helvetica Neue, Helvetica, sans-serif',
       'Impact, Charcoal, sans-serif',
       // You can then reference any of the custom fonts by name
       'Adlery Pro Swash',
      ],
    }),
  ],
};
Toubleshooting
Issues with Sharp
This plugin depends on the sharp image library. This is also a dependency of Vendures AssetServerPlugin which is commonly installed in Vendure projects. The version of sharp used by this plugin may be different to that used by the AssetServerPlugin. In this case, you may run into issues with errors like The specified procedure could not be found..
In this case, you can use yarn’s resolutions or npm overrides to force the sharp version to match that of the AssetServerPlugin.